![]() Sometimes, a Starlink terminal’s PCB can be so severely damaged that repair is impossible or impractical. However, in many cases, it’s still possible to salvage the terminal—or at least save the account details stored on the damaged unit. Various scenarios may arise, such as a valuable account, limited access to account management, or the high cost of purchasing a new terminal.
Sometimes, a Starlink terminal’s PCB can be so severely damaged that repair is impossible or impractical. However, in many cases, it’s still possible to salvage the terminal—or at least save the account details stored on the damaged unit. Various scenarios may arise, such as a valuable account, limited access to account management, or the high cost of purchasing a new terminal.
Saved account details can be transferred to an undamaged donor device. Donor Starlink units are typically found on eBay, similar marketplaces, or flea markets. These devices might be in perfect working condition, but have a lost or blocked original account. Donor units are often much cheaper than brand-new terminals, as they’re usually useless to the seller. This approach makes the repair both cost-effective and fast, as it doesn’t require complex procedures or diagnostics.
The account transfer method has been used in Ukraine since 2022 and has likely helped save thousands of terminals damaged during the war.
I kept this method secret for a while due to security concerns. However, it’s now more widely known and actively used. Additionally, many things have changed from a hardware perspective, so there’s no longer a reason to keep it confidential.
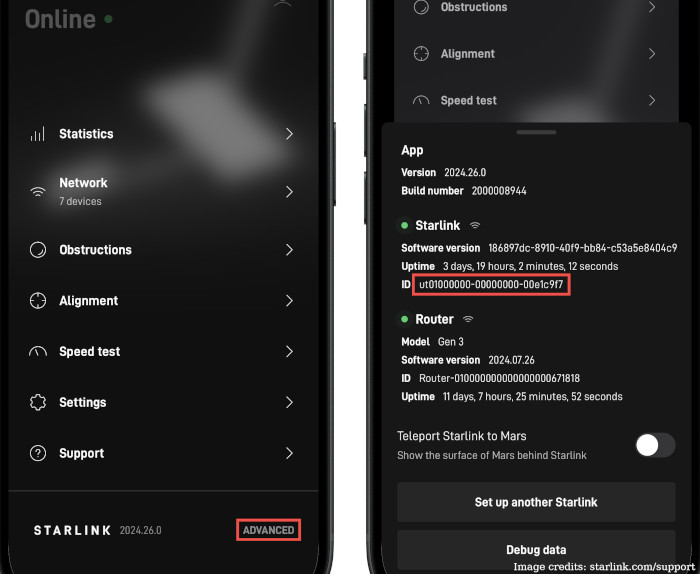
Starlink terminal identification and authorization.
User terminal ID.
Each Starlink terminal has a unique ID called the “UTID” (User Terminal ID). This ID is stored in the terminal’s secure co-processor and is used to identify the device on the Starlink network.
This ID can be found in your Starlink mobile app or your account web page. Since it is programmed into the hardware, it is always possible to read it via the app or gRPC API.
SpaceX identifies and manages Starlink terminals solely by this ID.
The user terminal ID can’t be reprogrammed.
Secure co-processor.
This highly specialized CPU uses the UTID to perform Digest authorization on the Starlink network. The Secure CPU is always bound to the UTID, which is typically stored inside this CPU.
Certificates.
Certificates are stored in a secure area (the location of which depends on the terminal revision) and used during the final stage of network entry and user tunnel establishment. This is the primary method for encrypting user network data. Certificates are also bound to the specific UTID and cannot be used with a different UTID if extracted.
The implementation of the secure CPU, UTID, and certificate storage depends on the terminal revision and the generation of the main CPU.
As for May 2025, there are two major generations of the main CPU: Catson and Catapult. Below, I will describe how everything works on both CPUs.
Serial number
This is the inventory number, and it’s not programmed into the terminal. It exists only in SpaceX’s database and is printed on the terminal’s PCB and case (or pole mount, depending on the terminal version).
The serial number can be used for accounting purposes and user-side identification of Starlink devices, typically when communicating with Starlink support.
KIT ID
The KIT ID is literally the identifier of the entire Starlink kit. It combines the IDs of the Starlink terminal, router, and any other components included in the box. This is another inventory-only number that exists solely in SpaceX’s database (and is therefore available in the user account) and is printed on the Starlink packaging. Like the serial number, the KIT ID is not programmed into the terminal, and the Starlink hardware has no knowledge of its KIT ID.
It’s a good idea to save the KIT ID when working with multiple terminals. Otherwise, it can be challenging to determine which devices belong to which kit once they’re mixed.
Catson CPU family
The Catson CPU is the original Starlink processor used in most terminals produced. There were four revisions of the Catson CPU, but these details are not relevant in the context of this article.
Starlink revisions with the Catson CPU:
rev_rev1_pre_production
rev_rev1_production
rev_rev1_proto3
rev_rev2_proto1
rev_rev2_proto2
rev_rev2_proto3
rev_rev2_proto4
rev_rev3_proto0
rev_rev3_proto1
rev_rev3_proto2
rev_rev4_prod1
rev_rev4_prod2
rev_rev4_prod3
rev_hp1_aviation_proto0
rev_hp1_proto0
rev_hp1_proto1
rev_hp1_proto2
You can find information about all the revisions here.
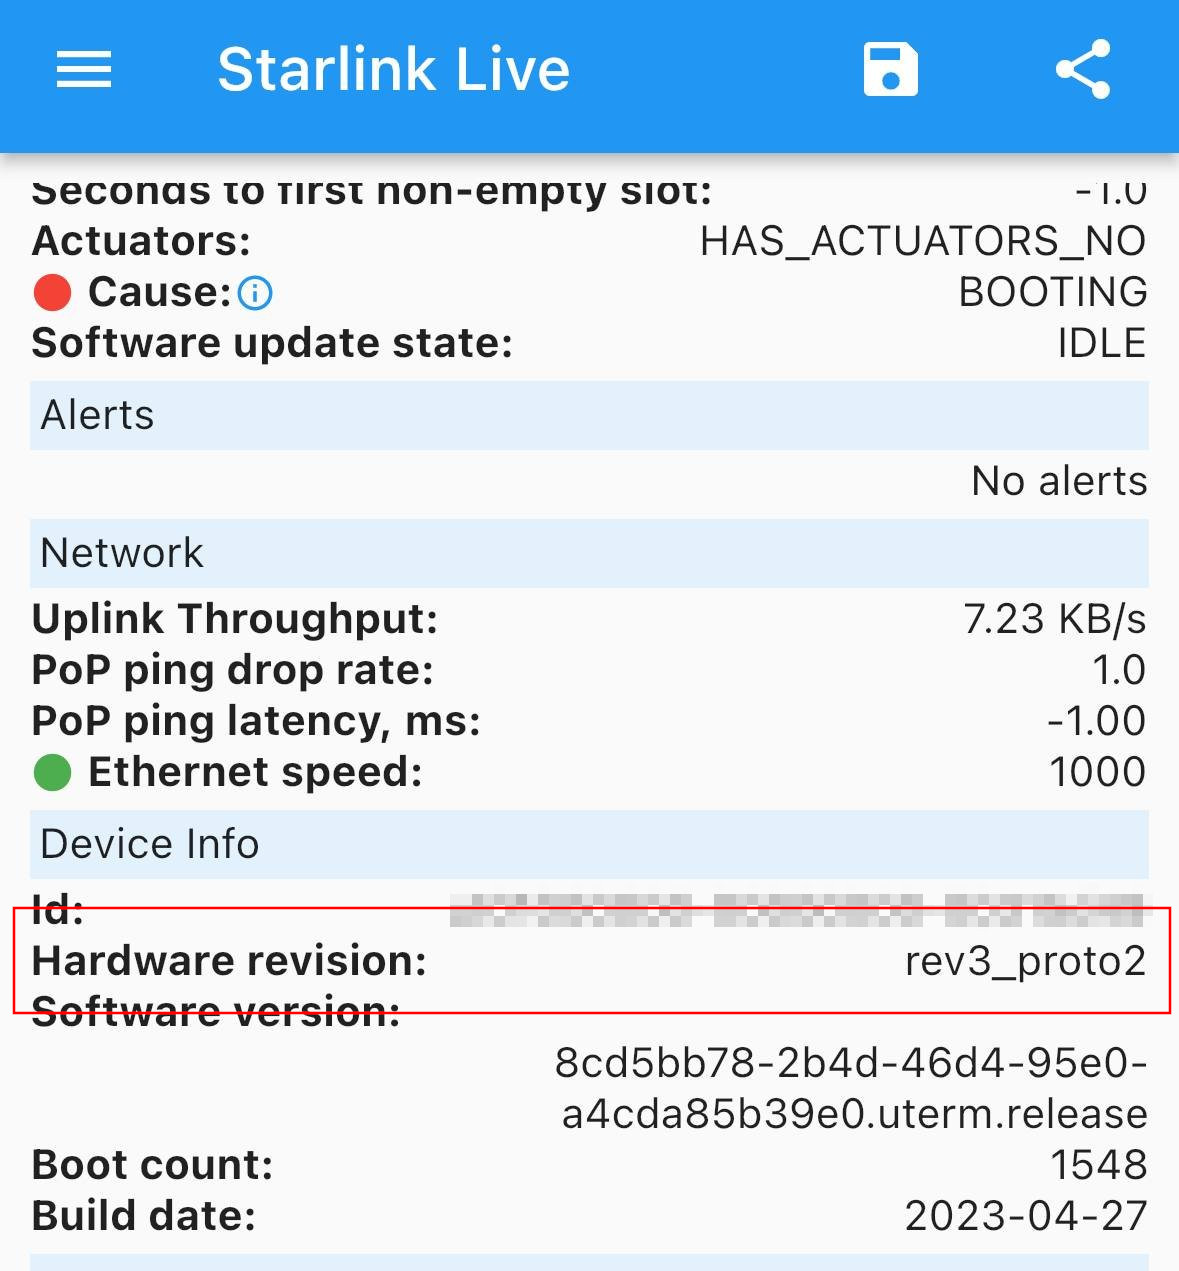
Also, you can always use the Star Debug mobile app to find the exact revision of your Starlink terminal hardware:
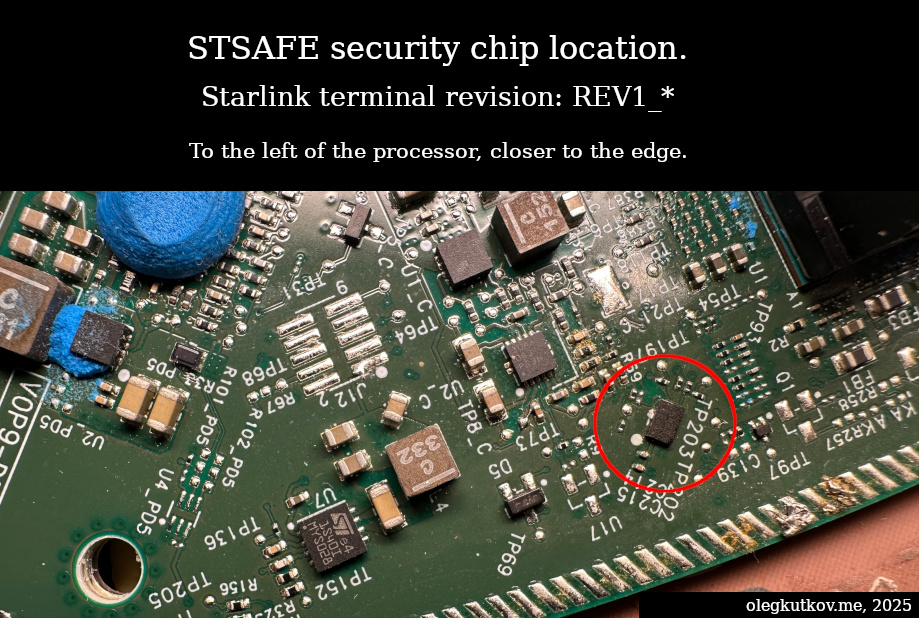
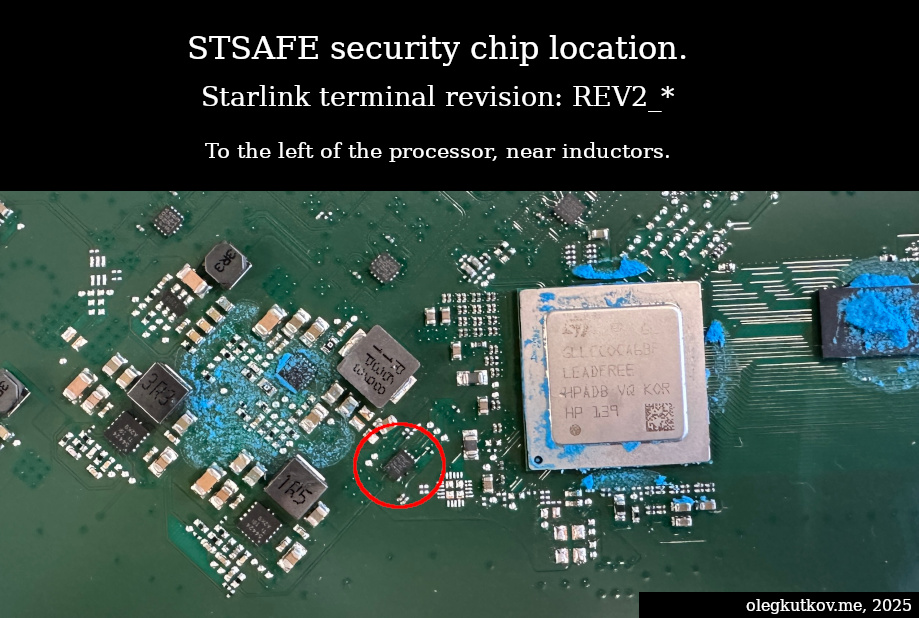
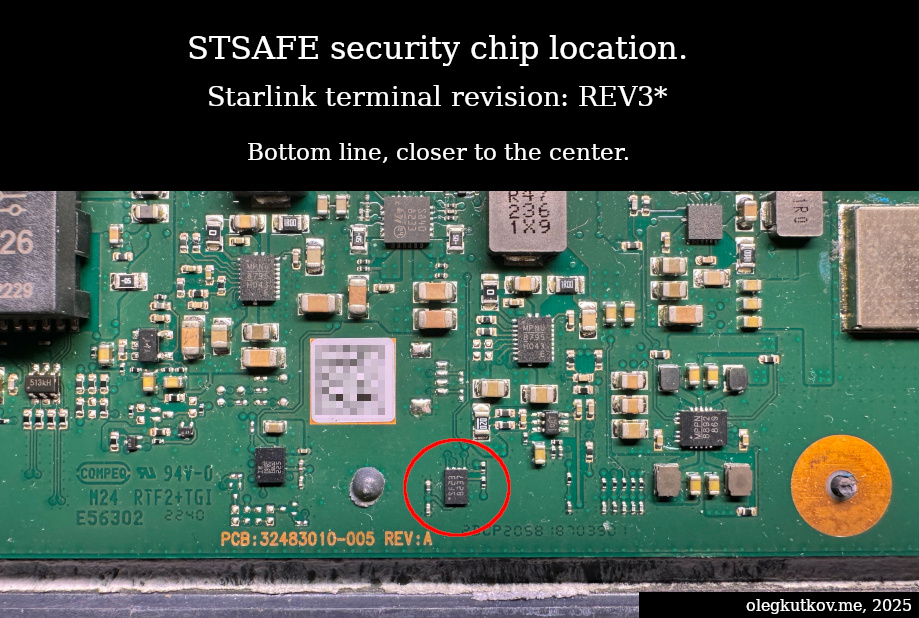
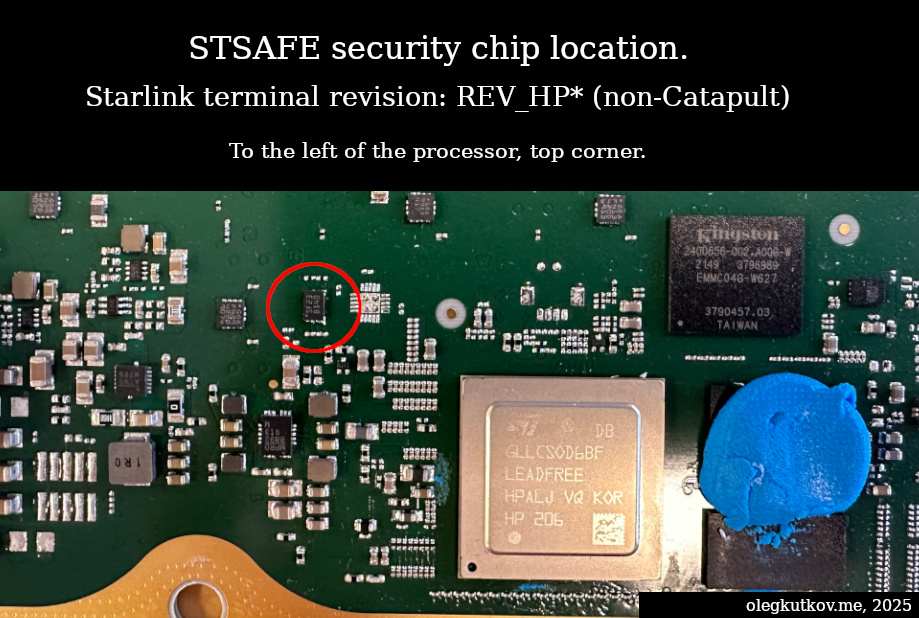
All Catson-based Starlink terminals are using a separate security chip – STSAFE-A110.
The common misconception is that this chip is similar to a flash or EEPROM device. In reality, it is a complex component that combines a cryptographic CPU with a relatively small, protected storage area. This storage is used for certificates, while the UTID and cryptographic keys are fused (provisioned) into the chip at the factory.
This single, small chip contains everything related to the Starlink account, making it easy to transfer the account between a damaged unit and a donor device.
Also, the STSAFE chip is not bound to the CPU, eMMC flash, or firmware. It can be transferred between different Starlink hardware revisions. For example, you can move it from an older REV2 round Dishy to an HP or REV4 unit, and it will work without any issues. Let’s hope SpaceX doesn’t block this useful feature in future firmware updates (right, SpaceX guys?).
That’s all you need – just move the chip from one board to another. This effectively creates a perfect “clone” of the damaged unit. From SpaceX’s perspective, it is the same device.
No additional steps are required.
Starlink firmware accesses this chip on boot and during each network entry. Never try to swap these chips on powered and booted terminals.
Please use the Star Debug or official Starlink app to check that the donor terminal acquired the “new” UTID that belonged to the damaged unit.
⚠️ Rework the chip if you see “unknown ID” or “RF error” in the Ready states. It might be bad soldering.
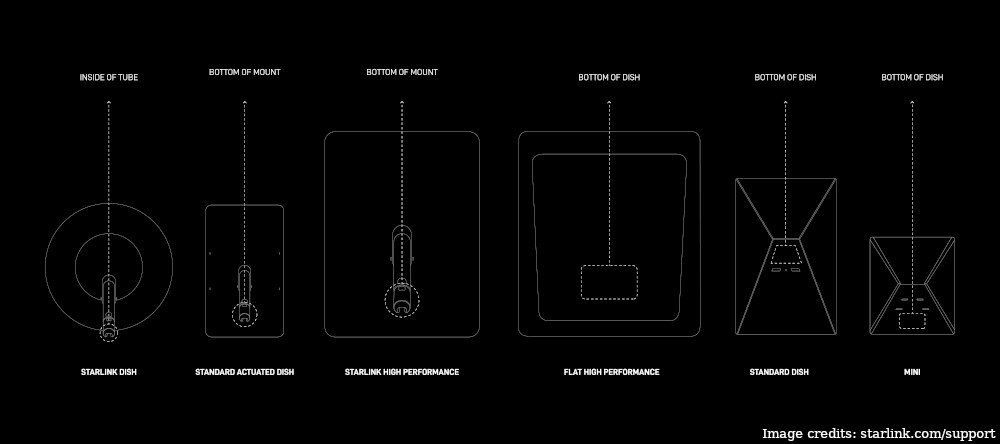
Below, you will find the STSAFE location on different Starlink revisions.
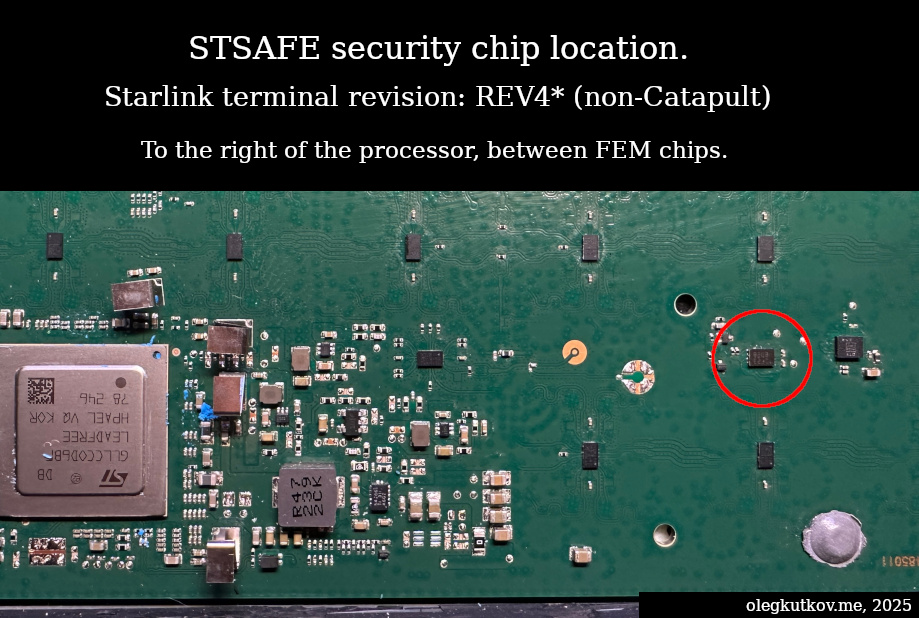
The new REV4 terminal is difficult to disassemble, so it’s much easier to access the STSAFE chip by creating a window at a specific location on the case:
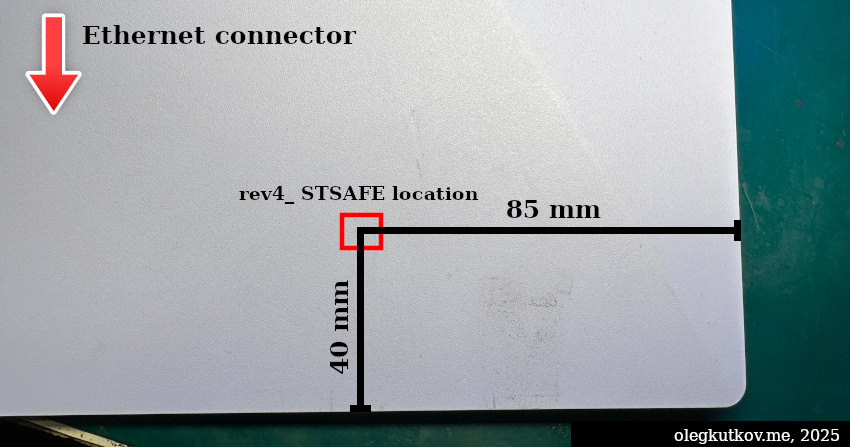
⚠️ The Starlink PCB has significant thermal mass, and the STSAFE pins are delicate—it’s easy to tear off the GND pin. Never apply force when removing the chip. If it isn’t “floating” and moving slightly when touched with tweezers, apply more heat using a hot air rework station and add some flux. Optimal air temperature is 390C. Don’t use a high air flow because blowing out the surrounding components is easy.
Catapult CPU family
All modern Starlink terminals, starting with the release of the Starlink Mini, are built on the new Catapult platform. The REV4 model has also transitioned from Catson to Catapult.
Starlink revisions with the Catapult CPU (as of Aug 2025):
rev4_catapult_prod1
rev4_panda_prod1
rev4_panda_prod2
rev4_hp_prod1
rev4_hp_prod2
mini1_prod1
mini1_prod2
mini1_prod3
mini1_panda_prod1
mini1_panda_prod2
“Panda” versions are the same Catapult-based terminals. The only difference is the type of radio Front End Modules. This is the latest production version. For some reason, SpaceX decided to include this name in the revision and remove “Catapult”. This creates some confusion.
You can determine which REV4 you have by looking at the Hardware revision in Star Debug. Alternatively, you can check the KIT ID on the box. If the KIT ID contains not only numbers but also letters, it’s Catapult.
The Catapult CPU introduces additional complexity. The standalone STSAFE chip is no longer present—its functionality has been integrated into the Catapult CPU as a dedicated RISC-V core. The UTID is programmed directly into this CPU, making each Catapult CPU unique.
You might notice that the UTID on Catapult-based devices looks different and uses more symbols. This is because Catapult UTID is effectively the ID of the built-in secure RISC-V core.
Since certificates and keys are no longer stored internally, they have been moved to the eMMC flash. As a result, the Catapult CPU and eMMC now form a matched pair.
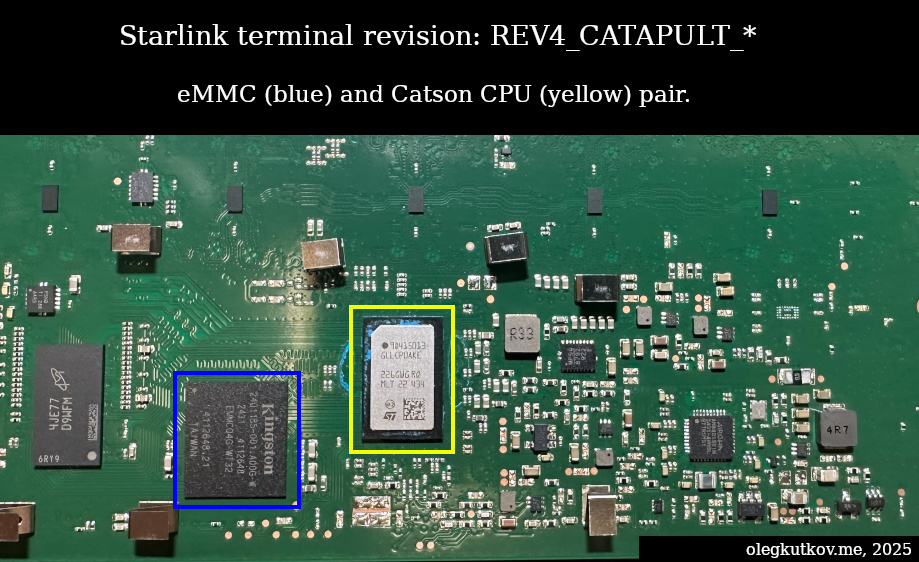
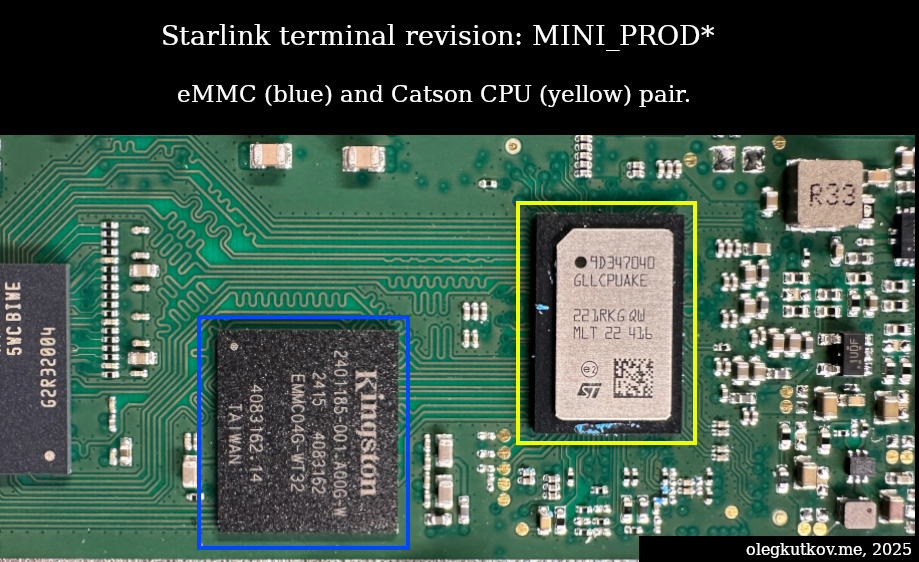
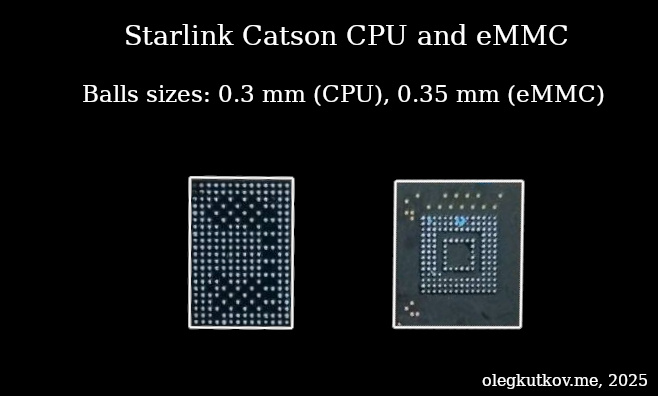
Transferring an account between Catapult devices is still possible, but moving both the CPU and eMMC chips is required. These are small BGA components, so this procedure demands advanced soldering skills and high-quality rework equipment.
Transferring an account between the Catson and Catapult platforms is, of course, not possible.
Important note about the “Panda” version of the Catapult terminals.
Panda is simply the name of the new FEM (RF Front End Module) chip. It’s a third generation of the FEM; there were “Peanut“, “Pulsar“, and “Bamboo“. Original rev4 and mini terminals are based on the “Bamboo” chip (in the photo on the left). Newer versions are using the new “Panda” chip (on the right). The new chip affects RF design.

As you can see, previously, there were 3 Ku-band traces between each FEM chip. Now there is only a single trace running from FEM to FEM.
Each FEM version and layout requires separate firmware running on the beamformer DSP. Thus, it’s impossible to swap the SoC and eMMC between older Bamboo and Panda boards, despite both boards using the Catapult SoC.
Terminal revision burned into the SoC might lead to loading of the wrong firmware and a non-working antenna. A SoC from the “Bamboo” board soldered to the “Panda” board will try to work with the antenna array as with the “Bamboo” version. This will lead to failure.
Please take this into account when doing repairs. Always use “Bamboo” donors for “Bamboo” terminals, and “Panda” for “Pandas”.
A note about Starlink firmware version
For Catson-based terminals, ensure that the donor unit’s firmware version is 2024 or later. Older firmware versions—particularly those from before late 2023—may no longer connect to the satellite and will be unable to update.
As of 2024, the terminal firmware can be updated using the official Starlink app without an internet connection. SpaceX added this feature to the firmware in early 2024, so older firmware can’t be updated from the app.
Alternatively, you can swap the eMMC chip along with the STSAFE chip to bypass issues related to outdated firmware.
For Catapult-based devices, you’re already swapping the eMMC, which carries the firmware from the damaged unit, so this issue does not apply.
—
Thanks for reading.
I hope this will help you with your repairs.
what do you meand with, . Never try to swap these chips on the fly ?
I mean on powered and booted Starlink terminal.
“As a result, the Catson CPU and eMMC now form a matched pair.” – did you mean “Catapult CPU” or am I missing something?
It was a typo. Fixed.
Thank you!
Can I transfer from a generation 2 to Starlink mini?
As I explained in the article, it’s not possible. There is no STSAFE IC in the Mini and you can’t write the data from your STSAFE to the Mini CPU.
Então no caso da mini, para usar a mesma conta em outra placa eu teria que jogar o CPU e o eMMC em uma placa boa?
Yes
Hello, excellent content. I work with maintenance of STARLINK terminals, I have come across terminals that after contact with water damage the eMMC in rev3 and rev4 (3rd and 4th generation) and when trying to do the Swap taking only the CPU the terminal freezes in (searching for satellite) would there be any solution since the eMMC was damaged?
Hello. In the case of Catapult-based terminals, there is no way except to try to recover and clone the eMMC data.
Hello, I work in the field of Starlink maintenance, especially mini and gen3. I always encounter a case of the processor dying, especially the 1.8v path connected to the io and GPS. Is there a suggestion, or has the terminal in this case turned into junk?
If the Catapult-type CPU is dead – the terminal is complete lost.
Hello, do I need to remove the PCB board for soldering? How do I mount it then?
Hello. You don’t need to remove the PCB.
Will the plastic of the case be deformed during soldering?
Fantastic work Oleg!
For the HP1 dishy, I would like to cut a window to access the chip rather than crack open the whole assembly.
Do you have a picture of the entire high performance board that you could share?
It would be interesting to somehow convert this to a socketed chip that can be easily swapped around. It would allowing a dish to “roam” without having to move the dish itself.
With this information is there a way to recover the current firmware and flash it to a round dishy that was not online for the November update? I picked one up at a thrift store and between that and Grok not wanting to let me transfer it IDK what to do with it since I can’t return it…
Hi, the idea is as follows: I have two devices, one with a PoE problem and the other working but missing data. Can I transfer data from the first device to the second using this method, or am I misunderstanding it? Please explain in simple terms.
Sure, you can. That’s why this method exists in the first place.
Вітаю. Підкажіть будь ласка як знайти трафарети для реболлінгу cpu та emmc на старлінках ген-3 та міні. Щось не можу знайти 🤔
Трафарет для Catapult процесора: https://gsmservice.od.ua/shop/trafaret-gllcpuake.html
Трафарет для Catson процесора: https://gsmservice.od.ua/shop/trafaret-gllcc0d6bf.html
Для eMMC теж там десь в каталогу має бути.
Thank you very much, my friend. This information is very valuable…
I have a V2 antenna with several short circuits and a burnt coil, but with this information I now know that I have several very valuable spare parts.
MY GREETINGS TO EVERYONE… THANK YOU FOR THE KNOWLEDGE YOU SHARE… IS THERE ANY WAY TO READ INSIDE THE STSAFE CHIP TO KNOW THE EMAIL OF THE REGISTERED ACCOUNT… THANK YOU
Hello. Email and account data is not stored inside the STSAFE chip. Starlink terminal knows nothing about it’s account.
STSAFE chip contains only user terminal ID (UTID) that is used to authenticate in Starlink network.
All the account information is stored on SpaceX servers. Account database contains all accounts data and corresponding UTIDs.
MY WARM GREETINGS… PROFESSOR, THANK YOU FOR YOUR RESPONSE… SO THERE IS NO WAY THAT A DEVICE PURCHASED FROM THE SERVICE OWNER CAN BE REACTIVATED BY ANOTHER PERSON AT ANY TIME OR ACCESS THE DATA THAT IS INSIDE THE DEVICE. THANK YOU FOR YOUR TIME